Category Archives: Firearm Accessories

Elzetta ZSM – Shotgun Light Mount

Having had prior experience with Elzetta products, I was pretty sure that I’d like their new shotgun light mount, the ZSM. In fact, when I heard about it months ago, I shelved plans to buy a railed forend for my Mossberg 500.

As it turns out, I made the right decision. Like the ZFH-1500, which attaches to the front sight base of an AR-15, the ZSM requires nothing more than a flashlight – you don’t need any rails. Everything, including adapters for 20 and .410 gauge shotguns, as well as flashlights from .7″ to 1.05″ in diameter, is included, and the standard model retails for only $39.95. The railed forend I was looking at was $75 – and would have required another $30-40 for a flashlight mount. Beyond that, it was of dubious quality – whereas the ZSM is of the highest quality. Every component – even the raw materials and the supplied allen wrenches – is made in the United States.

Elzetta also sent me their ZFL-M60 light, which has an excellent flood lens – although they’re sold as a package for $194.90, I’ll be reviewing them separately. I will say, though, that the “flood” effect is phenomenal indoors.

The ZSM places the light just below the bore of my Mossberg, with approximately 1/2″ between the light and the barrel. It’s obvious that a lot of thought went into the exact placement of the light, for not only did I find it to be an easily accessible location, but so did several other people with varying hand sizes and thumb lengths. Because of the position of the light, as well as the flood lens, the gold bead front sight reflects enough to be very visible against all backgrounds without reflecting so much that it obstructs my view of the target. Frankly, it’s better than any night sight I could imagine.

As I mentioned before, the ZSM is of the highest quality – the polymer is identical to that of the ZFH-1500 mentioned above, which I used on a rifle that sometimes had half a dozen 30 round magazines dumped through it at a time, for several thousand rounds, resulting in barrel temperatures over 600 degrees. After that, I took the light mount off – there wasn’t a single mark, burn, line, anything that indicated heat had compromised the strength or form of the mount. Given that, I don’t think it would be possible to load and fire a shotgun fast enough to cause damage to a ZSM mount attached to said weapon.

I loaded up several Walmart “bulk packs” (100 shells) of 12 gauge birdshot, as well as a box of 00 buck, and headed to the range. The only damage done was to my shoulder – the mount and light stayed in place and maintained perfect function. Obviously, that was a limited test, and I will continue to beat on this device until it fails – which might be a while. In the meantime, Elzetta has definitely earned my admiration for a well-designed and well-executed product, made entirely in the USA, which sells for a very reasonable price.

6 Comments

Filed under Firearm Accessories

Bushmaster .308 ORC – A2 vs. PWS FSC30 (Now Longer and With More SCAR)

Among the hours spent at the range today on half a dozen different projects, I shot the Orca with a PWS FSC30 attached. It doesn’t look like a huge difference on video, but the muzzle stayed on target instead of dipping, and I didn’t notice as much of a shove, recoil-wise, as I did with the A2.

I noticed with both the SCAR-17S (which uses the same device) and the Orca with the FSC30 that I wanted more than just earplugs. I’ve fired a wide variety of weapons, including some that are much larger than 7.62x51mm, and have never wanted double hearing protection as much as I did when I fired these two cannons.

Here is a comparison with the SCAR-17S (both weapons equipped with FSC30).

5 Comments

Filed under Firearm Accessories

Deliberate Dynamics Universal Speed Tab (UST)

Recently, I was offered a chance to T&E a Deliberate Dynamics Universal Speed Tab by a friend of the company. I say “recently” – I’ve had it a few months, and I’ve been using it quite a bit.

Before I go into the review, I want to cover my personal history of “support hand doohickey use”.

Here I am in Iraq with my M4. I’m using a full size vertical grip mounted towards the rear of the rail. Not only was this the popular setup at the time, it was pretty much my only option with a 7″ rail and a flashlight mounted on said rail. I used the “broomstick” grip – that is, my entire hand on the vertical grip, with my thumb wrapped around behind it. I basically used this grip to support the front end of the weapon. I didn’t really haul on the vertical grip in an attempt to pull the weapon into my shoulder. In other words, I didn’t really need that long of a vertical grip. Now, the MGL – the other weapon I’m holding – really did benefit from a vertical grip, because it gave the user more leverage to open and close the weapon.

I used long vertical grips in that position for a while after I came back, but started moving away from them after a few months. Why? Well, I found “stubby” vertical grips such as the LaRue FUG. Instead of holding on to the weapon with my entire hand, I centered my hand at the point where the grip met the rail, leaving just a few fingers on the front of the vertical grip, and putting my thumb forward. Also, instead of using this hand mostly for supporting the front of the rifle, I started putting rearward pressure on it – and noticed a definite improvement in my ability to make follow up shots.

After a while, I stopped using vertical grips entirely. I simply used “grippy” rail panels or standard handguards. My support hand thumb started moving up over the top of the handguard – first to activate a light, then to keep the muzzle down. In doing so, I cut a few ounces off the weapon while still improving my ability to put rounds on target.

Enter the UST. My initial impressions were that it was a very nicely machined part. I’m no expert on machining processes, but the layman in me can still recognize quality work.

However, it was almost too nicely machined, I thought, after I installed it on a rifle. The surfaces I was expecting to grip did not lend themselves to that as well as I had hoped. I thought the face of the tab needed a little more work than the vertical lines engraved there, and the curve immediately below the rail, at the very front of the tab, kept causing my hand to slip down, while the taper at the “bottom” of the tab prevented me from putting a lot of force on the front – my hand would start to slip off entirely.

I tried moving my entire hand against the tab (really, only a 3/8″ or so shift), as is demonstrated on the Deliberate Dynamics webpage, but this prevented me from activating my weaponlight with consistency. Slightly frustrated, I decided to turn my attention elsewhere for a few weeks.

Having misplaced the allen wrench used for installation, and not feeling like digging through my massive box of allen wrenches, I simply left the UST on my rifle for a while. This turned out to be its saving grace – well, that and the skateboard tape Deliberate Dynamics sent me.

It seems that the company was already aware of the issue I encountered – and being the clever folks that they are, their immediate solution was to send a piece of pre-cut skateboard tape meant to fit on the face of the tab. It might seem inconsequential, but it made a noticeable difference. My hand didn’t slip off nearly as easily as before. I could put a lot more rearward force on that point, meaning that my shooting became more and more effective.

I still wasn’t in love with it, though – I wanted the curve to start immediately from the rail surface, not a short distance away. This, however, was necessitated by the mounting design, just as the lack of checkering on the face of the tab was necessitated by the radius of the face itself – to do so would be quite expensive, and the part was already “not cheap” to manufacture.

For the few weeks I had the tab on the weapon but wasn’t consciously using it, what impressed me most was that I didn’t even notice it was there. It only adds an ounce to the weapon, and doesn’t protrude much. When I shot the AR at 600 yards from the prone position, it did not interfere with my shooting at all.

Look for the shadow.

That’s when I remembered that there were these things called “rail covers” that pushed the shooter’s hand away from the rail. I hadn’t used them in a while, having switched to ladder panels after using them on a POF T&E upper. Using a few cut up pieces from a Magpul XT panel, I found that I had finally achieved what I desired out of the UST – a comfortable and stable method of putting rearward and downward force on the front of the weapon, while still being able to easily activate my weaponlight. With gloves, the setup “clicked” for me like few other products have.

So, is the UST worth the $40 asking price? Well, if you’re a serious shooter, yes. What do I mean by that? Well, you’re not going to get the most out of it unless you really commit to “driving” the weapon, preferably while wearing gloves. If you shoot your AR (or other semi auto weapon) mostly for fun, especially off a bench, you probably won’t get a whole lot out of your purchase. If you do like to shoot and move, or your job requires you to, I would definitely recommend taking a look at the UST.

11 Comments

Filed under Firearm Accessories

Elzetta ZFH-1500 Flashlight Mount

When I first saw the Elzetta ZFH-1500 in photos, I didn’t think I would like it. It’s a flashlight mount designed to attach to the FSB – and place the light right under the barrel.

A “brief,” “abridged” history of my weaponlight experiences

I experimented with a number of flashlight mounts – and mounting locations – when I was first issued an M16A2. My initial attempt involved a rail designed to attach to the bottom handguard, through the vent holes. I placed a Surefire M3 in a First Samco light mount on the rail, and a heavy aluminum vertical grip behind the light.

Needless to say, this added a good bit of weight to the weapon, and it also kept coming loose (I preferred not to use Loctite in case some senior NCO or officer wanted me to remove the whole setup in the field). Mounting a vertical grip towards the magwell was in vogue at the time, so there was a good bit of barrel beyond the front of the flashlight, despite its impressive length. I found this to be detrimental when shooting over or around barriers, as I would often rest the barrel of the weapon on whatever was at hand if I was in certain shooting positions. It would be impossible to use the light to illuminate a target unless I pushed the rifle very far forward on the barrier – which was sometimes uncomfortable or not even possible, depending on the barrier in question.

Later on, when I was issued an M4 with a KAC M4 RAS, I used a Surefire 6P in various positions on the forend, including the bottom rail. Again, I couldn’t mount it far enough forward to clear a lot of barriers – and again, I was still putting the vertical grip at one of the rearmost positions.

Of course, mounting the light on one of the side rails has drawbacks too, though perhaps not as much as a light mounted towards the rear of the handguard at 6 o’clock – if you’re peering around a corner, depending on which side your light is on, you may have to expose a little more of the rifle (and yourself) to illuminate a target.

For quite a while, my favorite method of mounting a light was to use the Midwest Industries FSB rail and a Vltor light mount or 1″ scope ring – I had since moved my support hand farther forward, and this method allowed me to place the light on the weapon without the added expense of a railed forend. I’ll still use the MI rail on some rifles, and consider it to be a relatively lightweight and low cost solution for mounting a weaponlight.

Probably the most ideal position for a light – from a “tactical” standpoint – is 12 o’clock, in front of the FSB. However, this requires railed forends of a certain design, and a carbine gas system – which not every AR owner has or wants (on either count). It also requires the use of a pistol light, which is not designed for activation from that angle, though it’s something that shooters can get used to.

The ZFH-1500

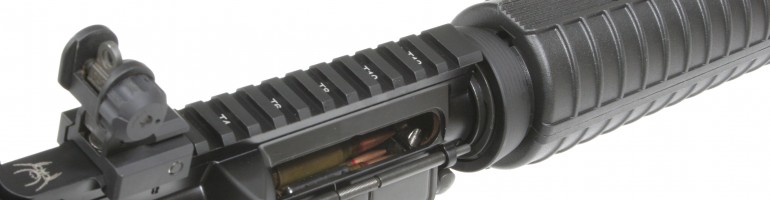
This brings me back to the Elzetta ZFH-1500. As you can see, when mounted on a midlength AR, the front (bezel) of a 6 volt flashlight is right behind the muzzle device.

Since hardly anyone rests only the muzzle device on a barrier, I don’t find that it’s a disadvantageous position. On the contrary, it’s easy to activate – the bottom sling swivel is very wide, yet doesn’t rotate from side to side much, making it very useful for activating the flashlight. When switching from strong side to weak side, the light is still easy to operate.

Beyond that, it’s pretty affordable. The standard mount, as pictured above, is $30 from Elzetta – $37 with a thumbscrew to tighten the screw holding the light in place. I found the thumbscrew to be useful and easy enough to tighten and loosen with a coin or the back of a knife blade.

My biggest complaint about the ZFH1500 – before I ever saw one in person – was that it prevented the use of a side sling swivel. Elzetta has corrected that with the introduction of both an add-on picatinny rail ($7, for use with your choice of sling swivels) and an add-on QD socket ($36). I haven’t used them, but they would appear to solve that “problem” quite nicely.

I was never too concerned about durability, though I’m sure some might be, because it’s “plastic.” It’s actually made of glass-filled polymer. It flexes just enough to allay any concerns or fears I might have had about brittleness. However, unlike the Chinese airsoft copies of the ZFH1500, it does not flex enough that a strong hand might be able to simply twist it until it broke off or was permanently deformed.

Testing

Although I did not hit the mount with a hammer or drop test it, I did attach it – and a light – to the Spike’s Tactical Midlength 5.45, which I fired 3000 times in under 2 weeks. At no point did the light come loose, nor did any of the screws keeping the two halves of the ZFH-1500 loosen up even a tiny bit. I did not use Loctite on any of the screws.

The FSB is pretty much the hottest part of the barrel once serious firing commences, and at several points during my test, FSB temperature was over 600 degrees Fahrenheit. However, when I removed the ZFH-1500 to examine it after the test, it looked practically new on the inside. In fact, other than some scuffs on the inside of the flashlight mounting ring from the knurling on an aluminum light, I doubt anyone could tell that it wasn’t brand new.

The light I used for the test – a Solarforce L2 with Malkoff M30 drop-in – has a slightly larger outside diameter than Surefires of the same ilk, so the tailcap couldn’t be rotated with the mount clamped properly. However, Surefire 6Ps and G2s, as well as the Elzetta ZFL-M60, did allow the tailcap to be rotated with the mount clamped. I did experience a few “negligent discharges” of the flashlight when picking the rifle up off a table or bench and catching the sling swivel on the edge of said table or bench. If the end user found this to be an issue, they could remove the sling swivel, or “lock out” the flashlight by unscrewing the tailcap.

Conclusions

The ZFH-1500 is one of a growing number of products that I was initially skeptical of – but after a detailed examination, have come to use with enthusiasm.

At 2.1oz, it’s about an ounce and a half lighter than the MI FSB rail/simple flashlight mount combo, and cheaper to boot. For someone on a budget looking to put a light on a home defense rifle, this would be ideal. A quality light such as a Surefire G2 LED could be procured along with this mount for under $100. There would be no worries about reliability or durability, and no apologies to be made in terms of quality. Police officers may find the ZFH-1500 especially interesting because it will fit, with a light, in many patrol cruiser rifle racks easier than some side-mounted lights.

Of course, if one has a railed forend, the need for an FSB light mount diminishes. Elzetta makes light mounts for those applications as well, and I’ll be reviewing one of them soon.

6 Comments

Filed under Firearm Accessories

Battle Comp Night Shoot Comparison

For the past two nights, we’ve traveled out into the desert in an attempt to get video of the Battle Comp in action. Our first night was cut short by a thunderstorm (and a very angry bull), but last night we did get decent video of the BC and other muzzle devices – the ubiquitous A2, the Vortex, the Blackout, and the PWS TTO.

Ammunition used was PMC 55gr, and all weapons involved in the test had 16″ barrels.

A big thanks to Joe and Nick for their assistance.

9 Comments

Filed under Firearm Accessories

What Can The A2 Do For You?

I’ll come right out and admit that I am a big fan of aftermarket muzzle devices. The PWS FSC556 is great for reducing muzzle rise (while not creating huge fireballs like other muzzle brakes/compensators), and the AAC Blackout and Smith Vortex do a fantastic job of reducing/eliminating muzzle flash visible to the naked eye. However, this doesn’t mean that the ubiquitous A2 flash hider is completely useless.

It does actually reduce muzzle rise slightly, compared to, say, the AAC Blackout, as I noticed recently while switching between the two for an accuracy comparison. It does a pretty good job of reducing flash, as seen in this video. It is fairly small and light, and also has a closed end, which increases durability and reduces opportunities for the muzzle to snag on debris or brush. A number of sound suppressors can mount to the A2 (or slightly modified A2 type flash hiders), if you’re interested in mounting a sound suppressor on your rifle. Best of all, for those on a budget, it’s very cheap, and the majority of upper receivers currently sold in the US will already be equipped with one.

Don’t assume that every rifle you purchase or build needs some sort of aftermarket muzzle device. They may be beneficial in some situations, but if the gas port is the proper size and in the right location – and the mass of the reciprocating parts are the proper weight  – for the ammunition you’re using, the recoil/muzzle jump characteristics of an A2-equipped rifle/carbine might surprise you. Furthermore, if you shoot quality ammunition, you might also be surprised at the lack of muzzle flash, even at night, when using an A2.

So do yourself a favor, and the next time you’re thinking about spending $50-100 or more on a muzzle device (especially if you haven’t fired the weapon yet), spend a little time at the range with your A2, and see if a replacement is really necessary.

BCM 16" Lightweight Midlength with A2 Flash Hider

1 Comment

Filed under Firearm Accessories

“Oh” AR-15 Products

In the last few years, an incredible amount of talent and resources has poured into the “black rifle” market.

Everyone in the community – from the weekend shooter to the servicemember defending our country overseas – has benefited as a result of this veritable explosion of new products and ideas.

Some of these products and ideas are surprisingly affordable. What the following products all did for me, though, was make me say “oh”. As in, this is an “oh” product – the kind of product that you just don’t really understand until you use one, and then you say “oh”.

1. Spike’s Tactical ST-T2 Buffer – $30


Many AR-15 carbines (specifically, 14.5″ and 16″ carbine length ARs) have reciprocating assemblies that are simply too light. While a high rate of fire sounds cool on paper, in extreme cases, a weapon that is cycling too fast can outrun the magazine spring, which will immediately result in some sort of malfunction.

In addition, standard buffers have weights that move a short distance in order to ensure that the bolt goes into battery and stays there (in extreme conditions, the bolt can bounce back out of battery slightly) – they slam forward inside the buffer after it has returned to its “rest” position, much like a dead blow hammer.

However, this additional fore and aft movement can give the impression of greater recoil. What Spike’s did was to replace the cylindrical weights inside the buffer with heavy tungsten powder. The powder still provides that extra insurance against bolt bounce, if not more insurance against bolt bounce, while reducing felt recoil. I’ll go out on a limb and say that according to my informal, unscientific observations, the ST-T2 buffer provides an amount of recoil reduction that might challenge some small muzzle brakes.

2. Magpul BAD – $30


It’s affordable, it’s well made, it’s easy to install, it’s simple, it’s unobtrusive, and it gives you more options when it comes time to let the bolt fly home. But it also lets you lock the bolt to the rear without removing your firing hand from its proper position – that is, in my opinion, a very nice benefit. This will allow you to clear certain malfunctions faster. This is a good thing. It is, simply, a very effective device.

3. Bravo Company USA BCMGUNFIGHTER Charging Handle – $45

This is definitely an “oh” product. I didn’t think that I needed to replace my charging handles until I was sent a GFH by Bravo Co. Not only is this product stronger than the “standard” model – via design changes and high materials standards – but it greatly reduces the effort required to manipulate the charging handle. I can finally do what I was trained to do – use the knife edge of my hand against the charging handle – without slipping off the standard latch or worrying about an extended latch breaking the charging handle. The GFH does all that for about the cost of a “regular” charging handle and an extended latch. It’s a no brainer to me.

5 Comments

Filed under Firearm Accessories, Reviews